Makeup Tips
 Halloween, Costume
Parties & Face Painting
|
Scars, Cuts and Bruises ||
Werewolf ||
Vampire ||
Alien ||
Witch ||
Skeleton Head/Grim Reaper ||
Zombie ||
Cat/Animal ||
Frankenstein Monster ||
Rag Doll ||
3-D Gel ||
Latex Textures
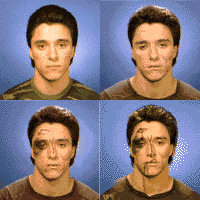
Scars, Cuts, and Bruises Makeup Application Black Eye and Fresh Cut
B. Sculpt thin layers of modeling wax over areas to appear swollen and cut. Make sure the edges blend into skin. Once edges are blended, smooth surface with fingers coated with cleansing cream. Smooth wax can be textured with a stipple sponge. C. Base with an appropriate skin shade or with purplish colors for bruise. D. If desired, cut into wax and redden with makeup and stage blood. Healed Scars
A. Apply rigid collodion to the skin in fine lines where you
want scars to appear. This material must be applied to clear
skin (no base or moisturizer). Rigid collodion will shrink and pull the
skin into a puckered scar shape. Hints: Lines should be thin and allowed to dry before a second coat is applied. Keep away from eye area.
Rubber Nose, Makeup Remover Cream, Fang Teeth, Stipple Sponge, Powder Puff, Powder Brush
A. Apply a thin coat of Spirit Gum where Modeling Putty/Wax will be applied. When nearly dry, sculpt
desired nose shape with Modeling Putty/Wax. HINT: Rough sculpt shapes and blend edges into skin.
Lubricate fingers with Makeup Remover Cream to smooth shapes. Texture surface with Stipple Sponge. Hints: Crepe Hair can be straightened by loosening braid and wetting the hair. Stretch the unbraided strand and allow to dry (or force dry with a blow dryer). Avoid using thick pieces of hair.
B. Using Black makeup, "hollow" facial bones to add angularity to the face. Follow cheekbone line with Black makeup from the front of the ear down toward jaw line. Feather the Black down to create a deep shadow effect. Draw straight lines from the tip of each nostril to form an arch over the outside corner of the eyebrow. Outline eyes in Black. Accent frown lines between brows. Draw a line following natural creases from alongside nose to the corner of the mouth. C. Paint mouth Black, extending lines down at corners. Add a dramatically thick "fake" brow to forehead. Accentuate temple area with Black makeup by outlining from hairline to sideburn area, leaving "peaks" at each temple. Gently powder fresh makeup area with Colorset Powder and brush off excess with Powder Brush. D. Draw in Blood dripping from mouth with R/B Red makeup. Complete the look with fangs, costume, Stage Blood and angry looking scowl!
Modeling Wax, Powder Puff, Makeup Remover Cream, Powder Brush
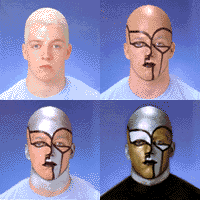
A. Apply bald cap with Spirit Gum. Be careful to keep Spirit Gum out of hair and away from the eyes. Hints: When using bald cap, you may choose to keep ears covered with the cap to add to the "alien" effect.
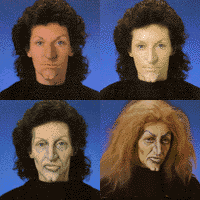
Rubber Nose & Chin, Makeup Remover Cream, Wig, Stipple Sponge, Powder Brush, Powder Puff
A. Apply a thin coat of Spirit Gum on nose and chin area where Modeling Putty/Wax will be applied.
When nearly dry, sculpt desired nose and/or chin shapes with Modeling Putty/Wax.
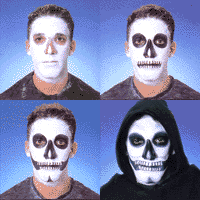
Skeleton Head/Grim Reaper Makeup Application
B. Using black makeup (we used CreamBlend Stick), fill in areas around eyes and sides of nose. In addition, apply black makeup to lips and draw vertical lines above and below black lips with a cosmetic brush. C. Follow cheekbone line with black makeup from the front of the ear with a thin line, toward the edge of the mouth with a thick line. Also, create the triangle design at the tip of the chin. D. Finish mouth by connecting and closing vertical lines with a horizontal line using black makeup. Define the hollowed out areas around forehead, eyes, chin, and cheeks using a color lighter than black makeup (we used CreamBlend Stick Monster Grey). "Set" entire makeup with Colorset Powder. Add black robe with hood. Hints: Do not mix water soluble makeups with grease makeups. Start with a minimum of makeup. It's easier to add more color than to subtract.
B. Work pieces of Nose Putty by hand to form top and bottom portions of "open wound" on forehead. (A light film of Spirit Gum will aide in adhering Nose Putty pieces to forehead.) Build up the bridge of your nose with Nose Putty, leaving an angular gash to simulate wound. C. Cover entire face and Putty constructions with Flesh Makeup. Highlight cheekbones, jawbones and temporal ridge with a light application of Clown White. D. Create "hollow look" by drawing lines under eyes, cheekbones, along frown lines and under natural brows with No. 10C Brown Makeup. Hollow neck by lining neck muscles with the same color. E. Outline forehead Putty construction and fill in nose gash with R/B Red Makeup. Using Stipple Sponge, stipple Black and No. 10C Brown Makeup onto cheeks and forehead to simulate skin decomposition. Complete the look with Stage Blood and costume.
Mehron's Tri-Color Alien Makeup Palette containing black, gold and silver makeup
A. Sketch eyeliner, nose and upper lip shapes with black makeup. The other
hair designs on face can be painted with a color to match wig or hair color.
Frankenstein Monster Makeup Application
A. Using a makeup sponge apply a Green makeup base to the face leaving room around the hairline and
eyes. Lightly dust with Mehron "Colorset" Powder removing excess with Powder Brush.
Optional Special Effects and Tips:
A. Cover face with appropriate skintone base (we used
CreamBlend Stick no. 2B Extra Fair). Choose foundation according to
natural skin tone. A warm, healthy glow works best with this character.
"Set" makeup with Colorset Powder and remove excess with a Powder Brush.
Leave room around eyes for accent color.
Hints:
Mehron 3-D Gel Special Effects Application
A. Place bottle of Mehron 3-D Gel into hot water
(70 C/158 F water is optimal. NO HOTTER!) until Gel has liquefied
(Do Not Microwave). Always test the temperature of Gel before using.
Apply directly from the bottle, or squeeze small amounts onto a clean
hard surface.
Optional Special Effects and Tips:
Latex Textures Makeup Application
Two different textures are shown. The left side of the photo is created with cotton and latex, which produces a lumpy surface. The right side is created with tissue and latex. This technique creates a wrinkled or "mummified" surface.
A. Begin both techniques by applying a thin coat of
liquid latex to the skin. Latex can be applied with a brush or a sponge
on larger areas. Work on small areas of the face as shown in figure 1.
The latex dries quickly.
Optional Special Effects and Tips: Costume World is a Mehron dealer. Makeup instructions courtesy of Mehron. |

 Scars, Cuts and Bruises
 Werewolf
 Vampire
 Alien
Alien
 Witch
Witch
 Skeleton Head/ Grim Reaper
 Zombie
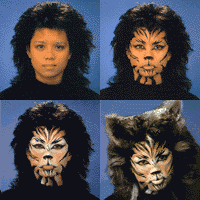 Cat/ Animal
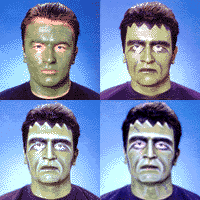 Frankenstein Monster
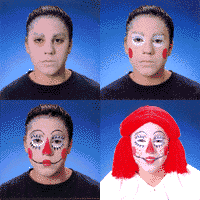 Rag Doll
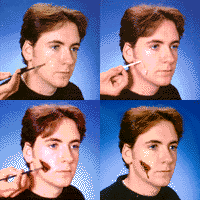 Scarface
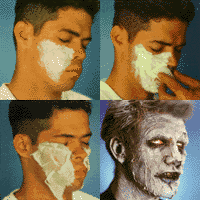 Ghoulish Zombie